
Introduction
![]()
This guide explains how to host a dedicated Valheim server with Docker that can be run at home while still being publicly accessible over the internet so your friends can join anytime. Ideally the server is hosted on a spare computer, but it can still run on the same computer you play on.
For those unfamiliar, Valheim is a builder-survival that is akin to Minecraft but much darker and focused on a Viking theme, which has gone viral with over 1 million purchases in its first weeks. Now is a better time than ever to start playing!
If you’ve worked with Docker before and know what you’re doing, feel free to jump straight to using the image I built:
- Docker Hub: sethmachineio/valheim-server
- GitHub: valheim-server-docker
Why host your own?
Valheim does have “peer-to-peer” hosting. But if the host logs off, then the world is no longer accessible to anyone and everyone else gets removed from the world. Hosting a dedicated Valheim server solves this by being accessible 24/7, so your friends can play even if you’re not online. This makes the experience all the more immersive.
Hosting at home also means a lot of cost savings. It’s already possible to rent a dedicated Valheim server for around $12/month. However, I estimate my 2013 iMac would only cost around $7/month to run 24/7 (assuming the monitor is completely turned off). See: iMac energy consumption and Electricity usage of a Computer calculator. I used 100 watts as an estimate. That is a cost savings of over 40%!
In summary:
- You want a dedicated server running 24/7.
- You want to save over 40% compared to renting a dedicated server (or buying compute from AWS/Google Cloud, etc.).
- You want to have fun on a mini project and learn about Docker/hosting.
About Docker
Docker allows for a repeatable and configurable process to manage running the Valheim server. Meaning if we ever need to update the server, we simply rebuild it in a single command with Docker. As a Docker container, the server can be run on any computer that also runs Docker. This means it’s easy to move the server to another computer if needed (e.g. more resources such as memory). Further, we can take advantage of Docker’s automatic restart policies, so the server will automatically turn back on if the host machine restarts.
If you want to host on macOS, Docker is absolute requirement, as Valheim is only supported on Windows and Linux. Using the steps in this guide I have been able to host my Valheim server on my 2013 iMac. Note that playing the actual game must be done on Windows or Linux.
Prerequisites
- You have access to the PC to run the server.
- You are comfortable using the terminal/command prompt.
- You have admin access to your router/ISP so you can change firewall and port forwarding rules.
- The host machine is able to run Docker.
- The host machine is able to run 24/7.
Setup Docker
Download and install Docker Desktop on the host machine. I installed it on macOS but same steps apply if you are using Windows or Linux. You may get prompted for a tutorial when starting Docker Desktop for the first time, feel free to complete it if you aren’t familiar with Docker.
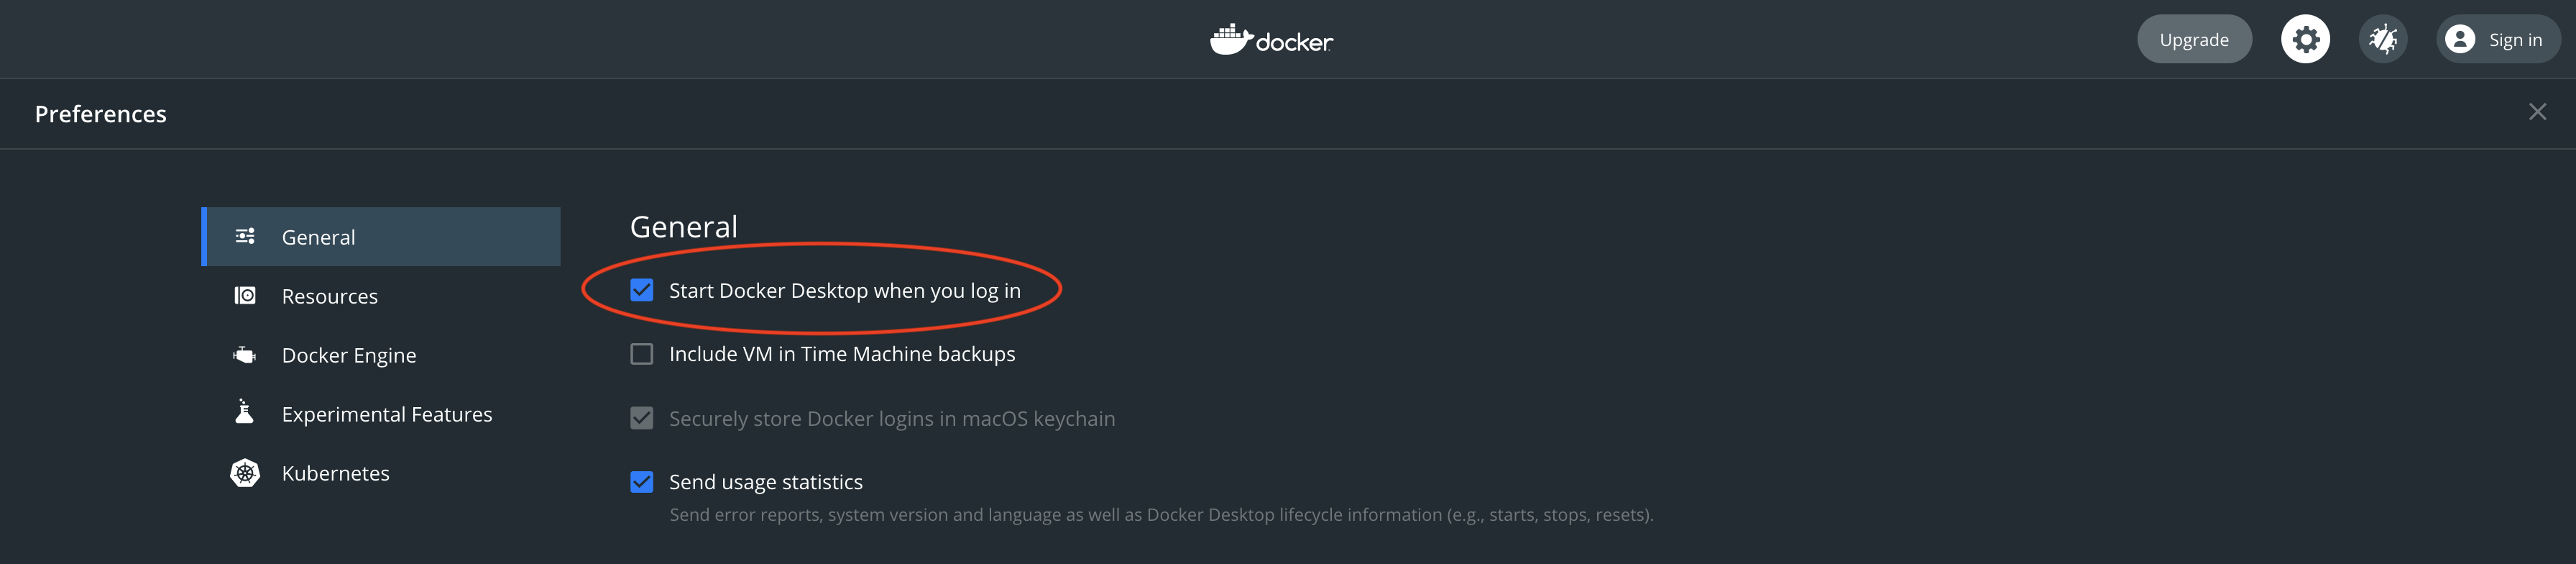
Once installed, head to Docker’s preferences to change resources and restart policy. Make sure to check the checkbox “Start Docker Desktop when you log in”.
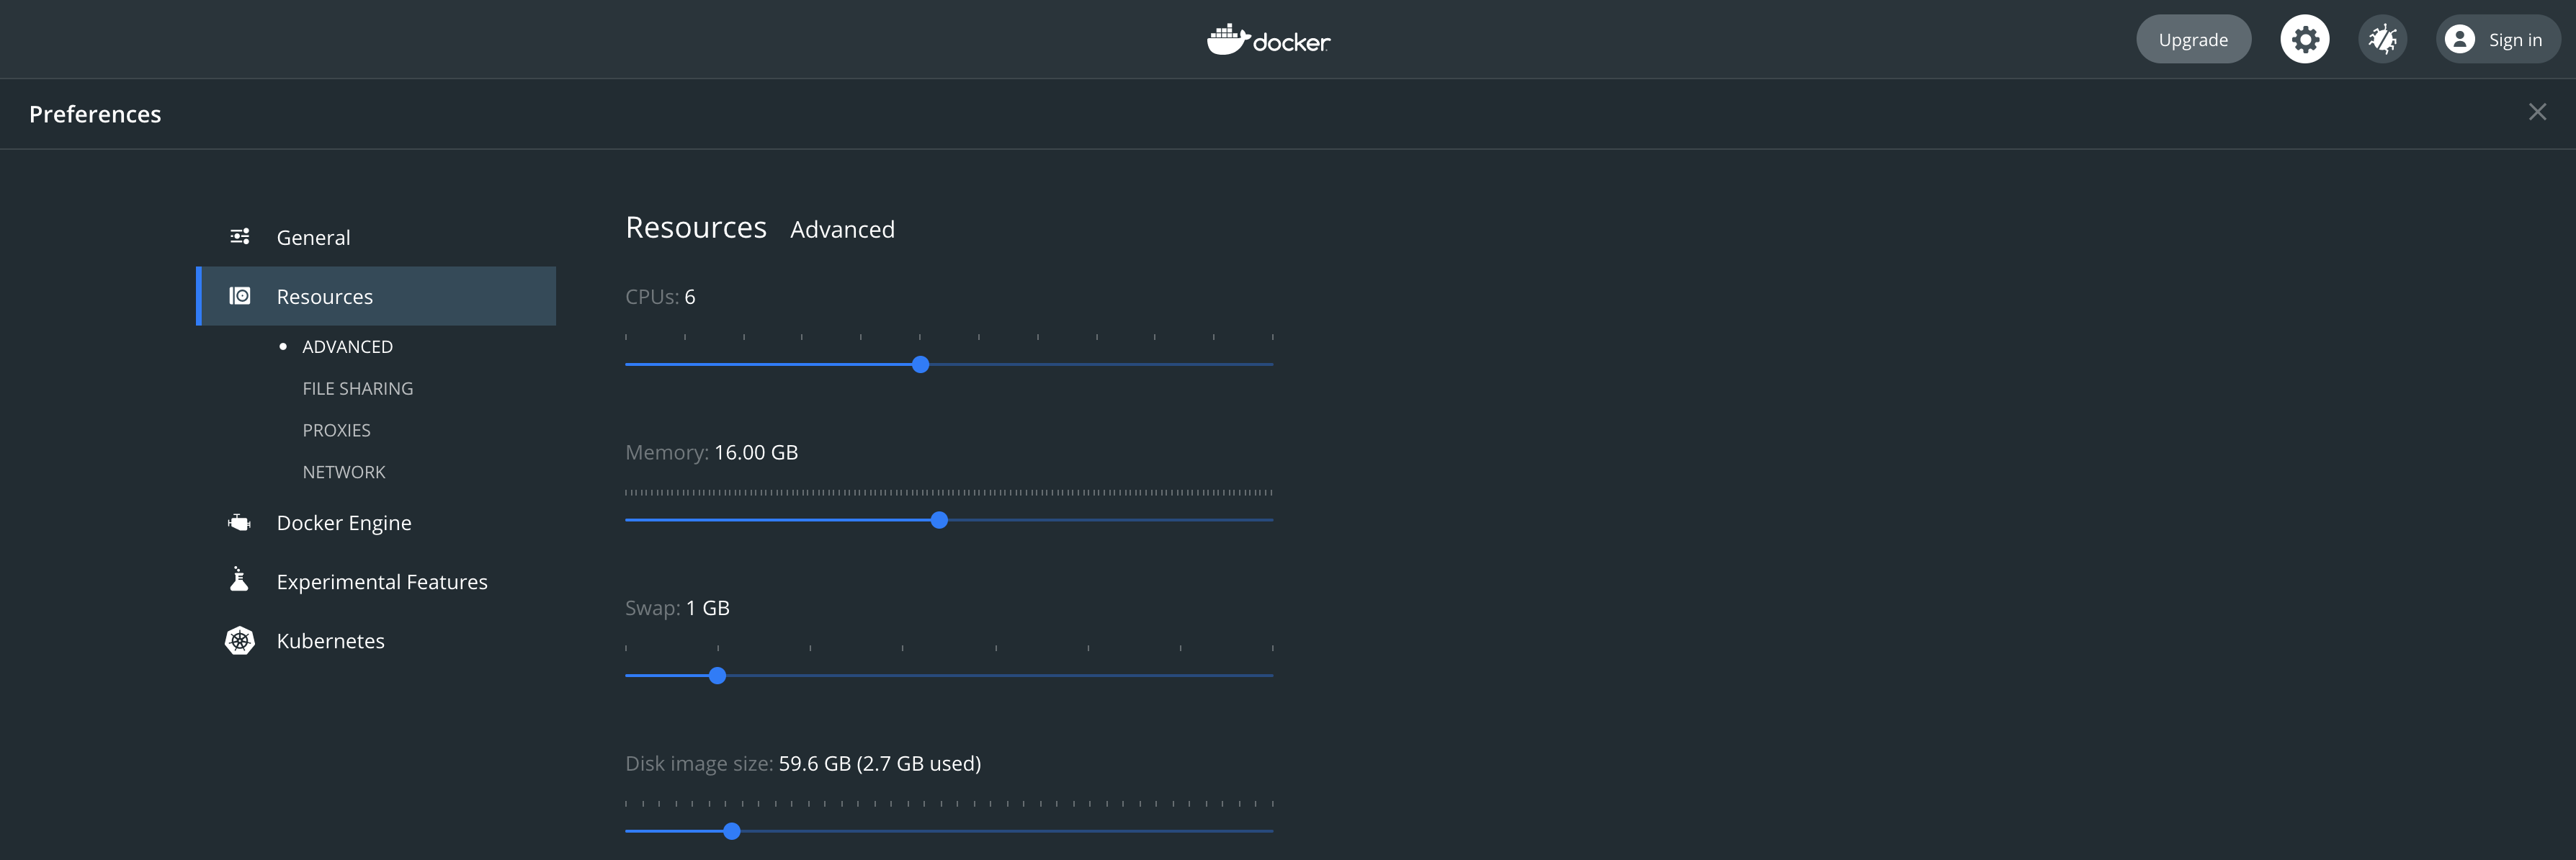
Change the amount of memory, CPUs, and disk space Docker is allocated. Any running Docker containers won’t exceed the amounts here. If the host machine is just running the Valheim server, I’d recommend to allocate all available memory and CPUs to maximize performance. The disk image size constraints how much storage Docker can use before it “runs out”; I set mine to around 50 GB. After making changes, hit “Apply and Restart” for it to take effect.
For next steps, we will be using Docker’s command line interface (CLI) called docker. The CLI is only available if Docker Desktop is running. To make sure it’s working, open a Terminal or Command Prompt and type in docker ps. You should see output similar to below.
sethmachine % docker ps |
Run Valheim on Docker
Now we need to download the Valheim server and somehow run it on Docker. Steam provides SteamCMD which is a command-line interface of the Steam client. It can be used to programmatically download Steam games and servers. We will use it to download the Valheim server. Thankfully there is already an existing Docker image that comes with SteamCMD ready to use: cm2network/steamcmd.
Download the Docker image:
sethmachine % docker pull cm2network/steamcmd |
Next let’s run the image in interactive mode to make sure it works and see how we could run a Valheim server.
sethmachine % docker run -it --name=steamcmd cm2network/steamcmd |
You should notice your command prompt has changed. We are now in the running Docker container in interactive mode. Some things to note:
- The Docker container will stop running if you exit (e.g. CTRL+D)
- While the container is running, use
docker psto find its container ID (host machine terminal) - The running container is named
steamcmd(from-=-name=steamcmd). - The same container can be re-activated by using
docker start --interactive steamcmd - To delete the named container, use
docker rm steamcmd.
With SteamCMD, we can now install the Valheim server. We need its ID which happens to be 896660. I found this information on steamdb.com: Valheim Server.
Run the following command to install the Valheim server in the running Docker container:
./steamcmd.sh +login anonymous \ |
After a minute you should see a message like “Success! App ‘896660’ fully installed.”
In the current directory, there is now a valheimserver/ folder:
steam@cf87295af3ac:~/steamcmd$ ls valheimserver/ |
The server install includes a manual which I’ve also made available here: Valheim Dedicated Server Manual (disclaimer: the manual is subject to change so this link may become outdated). The manual explains how to run the Valheim server and its different configurable options. Below is the command I used to copy the manual from the running Docker container. This command is run from the host machine’s terminal and not within the Docker container.
docker cp steamcmd:/home/steam/steamcmd/valheimserver/'Valheim Dedicated Server Manual.pdf' ~/desktop |
According to the manual, we should make a copy of start_server.sh and supply it with our parameters. The line to edit:
./valheim_server.x86_64 -name "My server" -port 2456 -world "Dedicated" -password "secret" |
The parameters (also explained in the manual):
-name: the name of the server that will appear in the server list-port: the port the server will run on. Keep the default as2456.-world: the name of the World that will be created, or the existing World to use.-password: the password to enter the server. Must be at least 5 characters.-savedir: where the server loads and saves the World data (not in the example as it is optional)
To create and edit a copy of start_server.sh:
- Copy with
cp start_server.sh example-start-server.shthen edit withnano(while in the Docker container). - Or, copy the file to the host machine, edit it there, and then copy it back to Docker
- Copy file to host machine to desktop:
docker cp steamcmd:/home/steam/steamcmd/valheimserver/start_server.sh ~/desktop - Edit and save as
example-start-server.sh. - Copy back to the Docker container:
docker cp example-start-server.sh steamcmd:/home/steam/steamcmd/valheimserver
- Copy file to host machine to desktop:
- (Linux/macOS) Make the script executable by running
chmod +x example-start-server.sh
After editing this is what my example-start-server.sh looks like (I removed the comments):
export templdpath=$LD_LIBRARY_PATH |
Now run it by entering ./example-start-server.sh in the Docker container. It should spit out a lot of different debug output. Of interest is it prints the world seed generated (since we did not use the -savedir parameter to an existing world).
02/13/2021 03:09:44: Initializing world generator seed:85nRPRACxA ( -1305926156 ) menu:False worldgen version:1 |
We can also see where the generated world is stored by default (according to the manual):
steam@109e3304d5f3:~/steamcmd/valheimserver$ ls ~/.config/unity3d/IronGate/Valheim/ |
Press CTRL+C to stop the server from running.
Congrats! If you’ve got this far, it means you can now run a Valheim server on Docker! There are a few more steps to consolidate what we’ve learned and then we have to open ports before your dedicated at home server is ready.
Create a Docker image
We did a bit of work in the previous steps and it’d be nice to avoid having to repeat it. Luckily, Docker provides Dockerfiles, which can be used to build new Docker images from existing Docker images. Our goal here is to make a new Docker image that automatically starts the Valheim server without having to enter the container and manually enter commands as we did before. The Valheim server also needs to be shutdown gracefully so that current world data is properly saved whenever the container is stopped or restarted.
The Valheim server Docker image should be as generic as possible while allowing a user to customize server specific behavior at runtime (e.g. which world to use, what the password is, etc.). The strategy to do this is to separate the environment and installation setup from the actual command to start the server. This means we will write a custom script to start the Valheim server that controls how the server is started and shutdown. The Valheim server also needs to persist the worlds data into the host machine (as the containers are meant to be ephemeral). Persistence is accomplished by binding a directory from the host machine to a Docker volume (this is also how we can add existing worlds to the server).
Given all that, here is our Dockerfile to build the Valheim server image:
FROM cm2network/steamcmd |
I added comments to explain each part of this new Dockerfile for building a Valheim server image. Of note is that behavior is customized by passing in different values for the environment variables, e.g. one could change the world name by passing in --env VALHEIM_WORLD_NAME="AWholeNewWorld" when executing docker run.
What does our start-valheim-server.sh look like? Below is what I’ve come up with:
|
(Linux/macOS) Note you may need to make the script executable by running chmod +x start-valheim-server.sh
This script is mostly a copy of the original start_server.sh script that comes with Valheim server installation. I’ve added comments to explain some of the changes made to accommodate running the server in Docker. Most importantly is providing a graceful shutdown to the running Valheim server, which needs a SIGINT signal to properly terminate (equivalent to hitting CTRL+C when running the server manually). Docker sends a SIGTERM signal by default. This script traps the SIGTERM signal, and then sends a SIGINT signal to the Valheim server process (the kill -2 command) before exiting properly. Without this behavior, the server would not terminate properly and thus world data would not be saved completely. For more background on why this is necessary, see this wonderful article: Gracefully Stopping Docker Containers.
To build our image, create a new directory on the host machine and create two files in it called Dockerfile and start-valheim-server.sh. Dockerfile should be exactly the contents of the Dockerfile I provided above, and likewise for the custom start script. Note the file to build the Docker image must be named Dockerfile. On the host terminal, enter the directory and build the new image using docker build:
sethmachine docker % pwd |
Note that rebuilding the image will re-use previous layers, including the version of the Valheim server downloaded. This is both good and bad. Good because it makes re-building the image very quick. But it is bad if Valheim has updated the server and Docker’s cache has gone stale. In that case, add the --no-cache argument when rebuilding if Valheim has been updated.
The new image should now show up when running docker image ls:
sethmachine % docker image ls | grep "valheim" |
Congrats, we have built a Valheim server Docker image! Now we need to run it as a container.
Run the valheim-server image
To run the Valheim server image, we need to decide where Valheim’s worlds data will be stored on the host machine, and then pass in parameters to decide the name, password, and world of the server.
The image volume /home/steam/valheim-data needs to be bound to a directory on the host machine where all worlds data is persisted. The host machine directory should be empty or contain a subdirectory called worlds which can contain already created Valheim worlds. When the Valheim server runs, if the world does not exist in the host directory, then it will be created anew. If the world already does exist (i.e. there are files in the worlds subdirectory with the name of the world), then the server will use it as the server’s world rather than making a new one.
On my host machine, I have a directory at /home/sethmachine/valheim-data which I will map onto the image’s volume. Here is what it looks like before I run the Valhem server and make a new world:
sethmachine valheim-server-docker % tree /home/sethmachine/valheim-data |
(tree is a helpful command to visualize a directory)
This folder already has an existing world that I copied over, OldWorld, but your folder can be completely empty.
There are 3 parameters to set when running the server. The server name and world name must be provided at runtime, otherwise the container will exit immediately.
VALHEIM_SERVER_NAME: the name that will appear in Valheim’s server list, truncated at first whitespaceVALHEIM_WORLD_NAME: the name of the Valheim world (can be an existing world), truncated at first whitespaceVALHEIM_PASSWORD: the password to join the server (can be set to empty for no password, default is “password”)
Below is an example command that runs a Valheim server with the host directory set to /home/sethmachine/valheim-data. Note this container is named valheim to make it easier to reference with Docker commands.
docker run --name=valheim -d \ |
Explanation:
docker run: creates a running container from an image, in this case the image issethmachine/valheim-server-d: runs the container in the background-p 2456:2456/udp -p 2457:2457/udp -p 2458:2458/udp: exposes and maps ports 2456, 2457, 2458 on the host to the container--env VALHEIM_SERVER_NAME="sethmachine'sServer": sets the server’s name--env VALHEIM_WORLD_NAME="AWholeNewWorld": sets the world’s name--env VALHEIM_PASSWORD="HardToGuessPassword": sets the server’s password
Use docker container ls to confirm the server is running:
sethmachine valheim-server-docker % docker container ls |
Use docker logs valheim to get output information about the server:
sethmachine valheim-server-docker % docker logs valheim |
Under the mounted host directory (mine is /home/sethmachine/valheim-data), there should be several files and a “worlds” subdirectory:
sethmachine valheim-server-docker % tree /home/sethmachine/valheim-data |
What each of these files mean:
AWholeNewWorld-logs.txt: this is a Valheim specific log file for the world we createdadminlist.txt: determines who is an admin (add Steam ID, one per line)bannedlist.txt: automatically bans players (add Steam ID, one per line)permittedlist.txt: whitelist for who can join (add Steam ID, one per line). Note if this has a single Steam ID in it, this will ban everyone else from the server besides players whose Steam ID is in this list.worlds: directory where Valheim worlds data is stored (including old or already existing worlds)
If you’ve seen similar output on your end, then congrats, you are able to run the Valheim server Docker image!
To stop the server, use docker stop valheim. This will create a new database (.db) file for the world as well:
sethmachine valheim-server-docker % docker stop valheim |
Note the new AWholeNewWorld.db file. This contains the save data of the world; because it has been created, we know the Valheim server shut down properly.
For the server to be up almost 24/7 we will want it to restart automatically whenever it is turned off (e.g. the host machine restarts or the Docker container somehow crashes, is killed, etc.). To do this, we specify a restart policy when running the container. The always policy appears appropriate, as it means the server will automatically run whenever Docker restarts. Only manually stopping the server with docker stop will prevent it from automatically restarting. Finally, this gives us a suitable command to begin running our server indefinitely!
docker run --name=valheim -d \ |
With --restart always and Docker Desktop set to restart on log in, our server should be up and running all the time once we execute the above command. Note you can still use docker stop valheim followed by docker rm valheim to stop the server completely (e.g. you want to run a different world or take a break).
Port Forwarding
This step is highly dependent upon your internet service provider and firewall settings of the host machine. You will likely need to do additional research to open the ports on your host machine
Hosting a dedicated server requires allowing incoming connections from the ports the Valheim server uses. These ports are 2456, 2457, and 2458 (UDP protocol). Without these ports open, your server will not be visible and your friends cannot play with you.
In general you will need to follow these steps:
- Disable any firewall software on your host machine. If you know how to modify your firewall just for the Valheim ports, feel free to do so instead.
- Find your router’s IP address and then log in to it, e.g. see How to Log In to Your Router
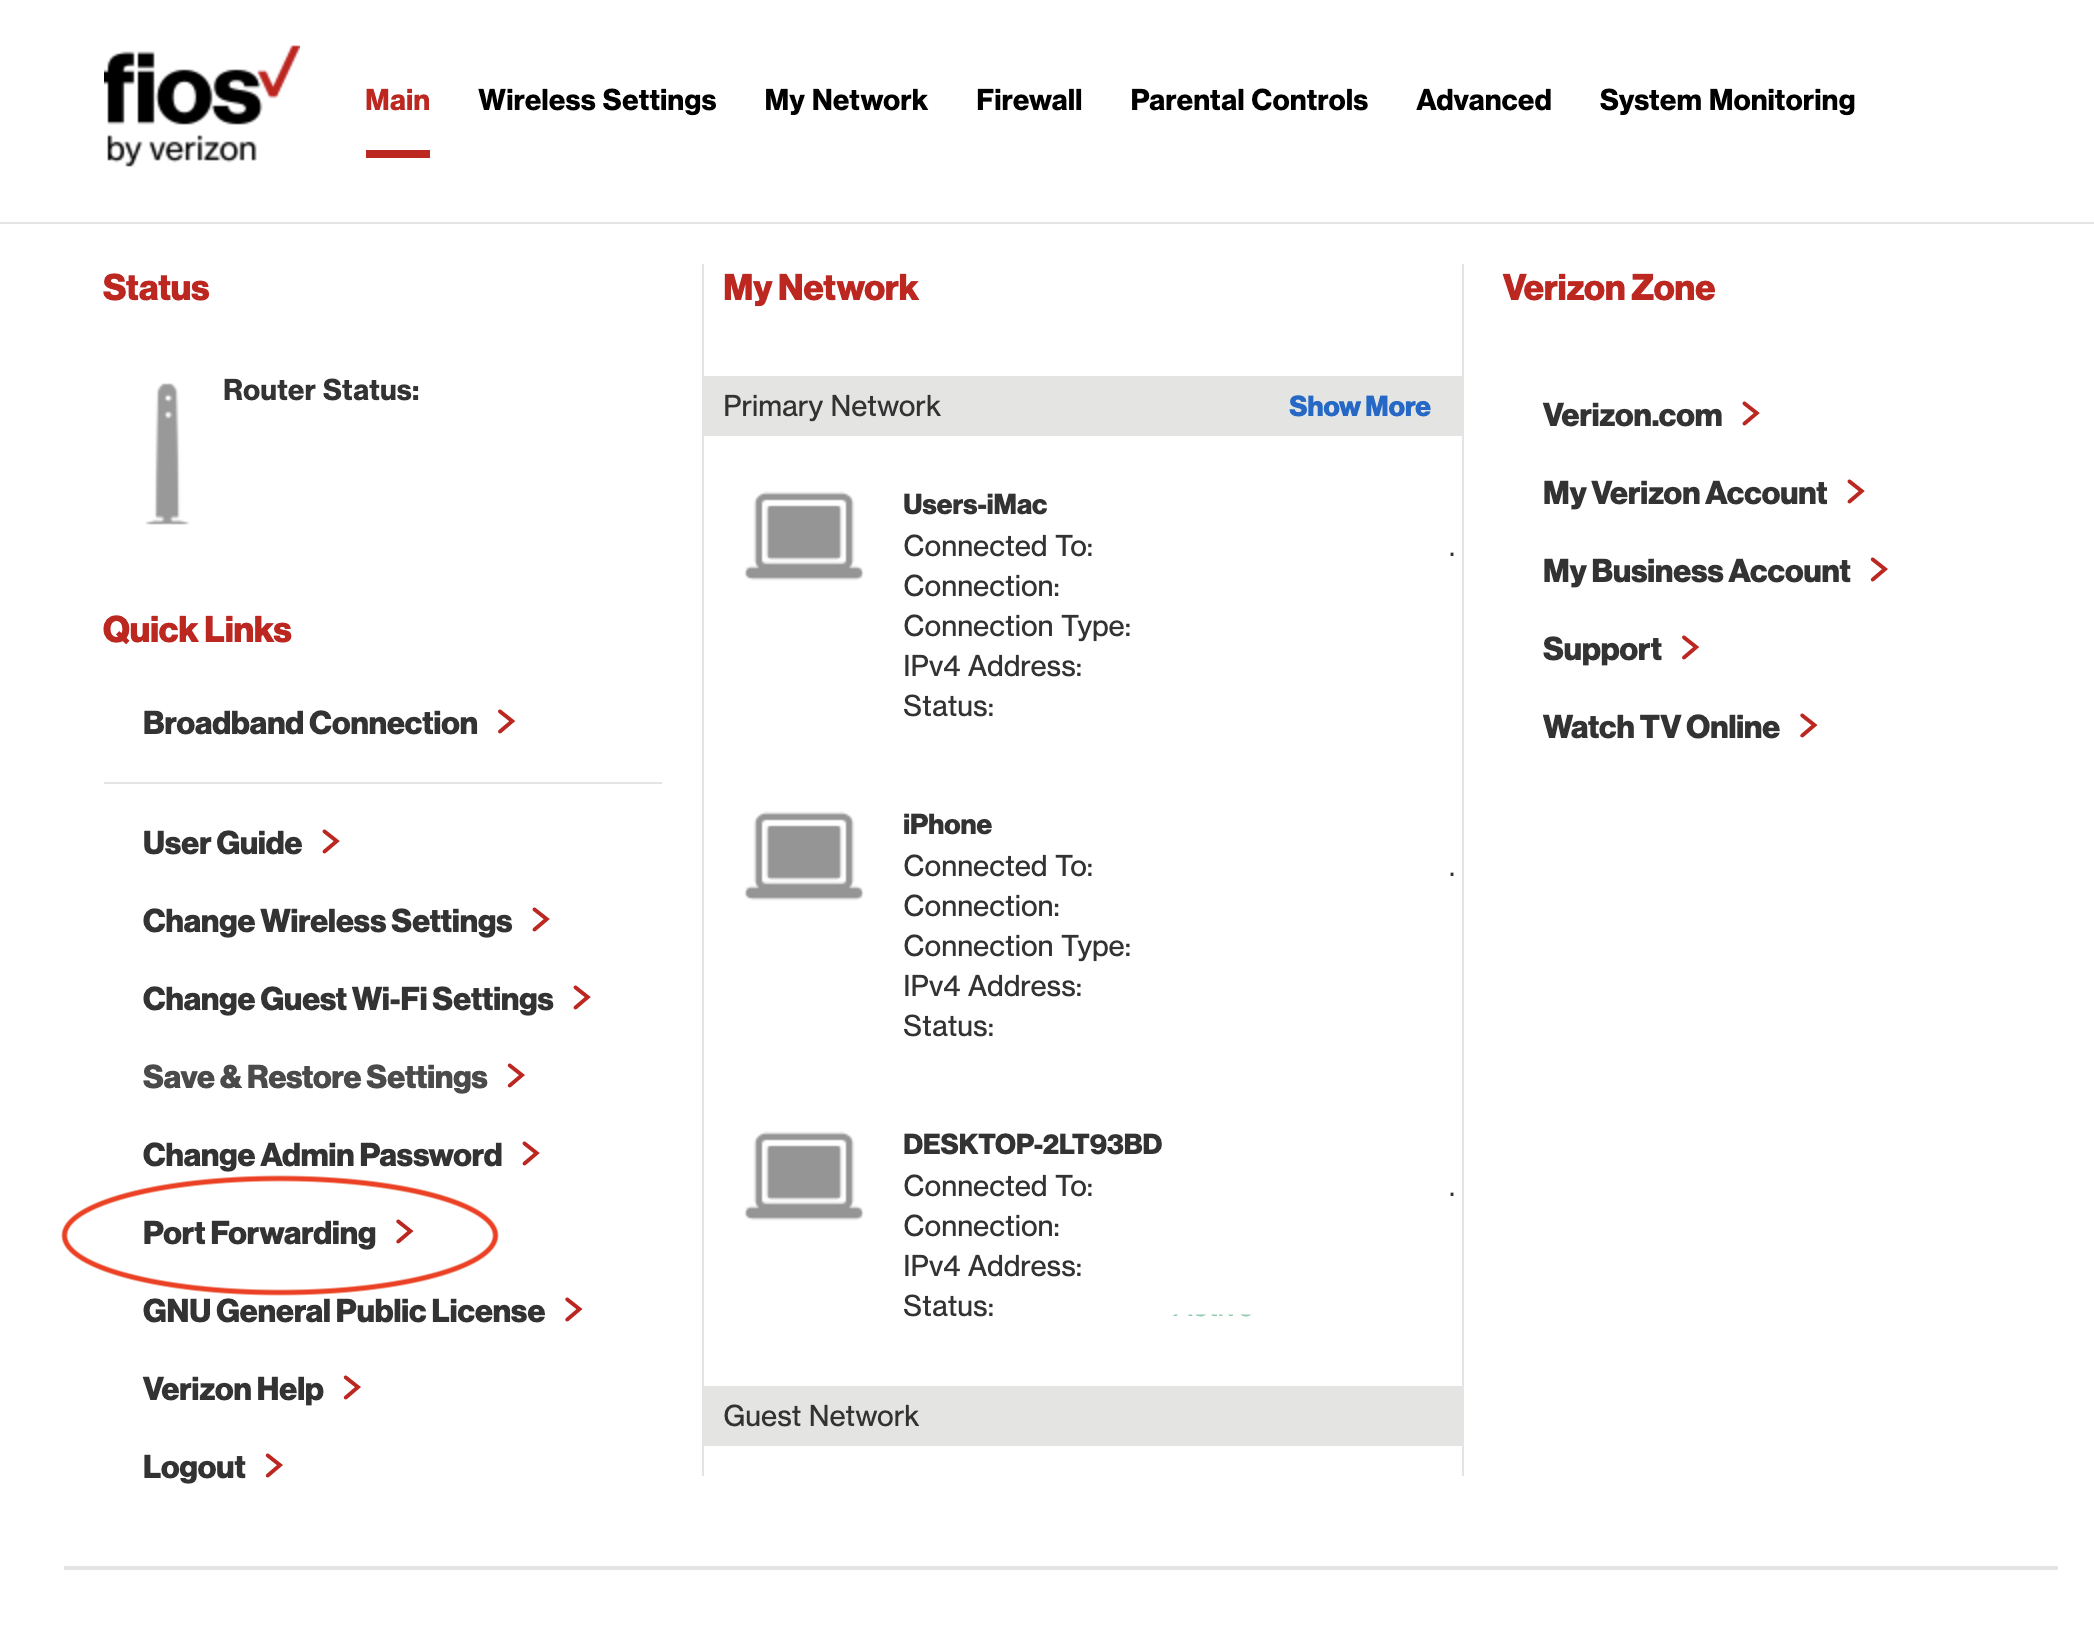
- In the router admin controls, find where to add port forwarding rules.
- Find the LAN IP address of the host machine, e.g. see: Find your LAN IP address. The LAN IP is the IP assigned to the host machine within your local/home network.
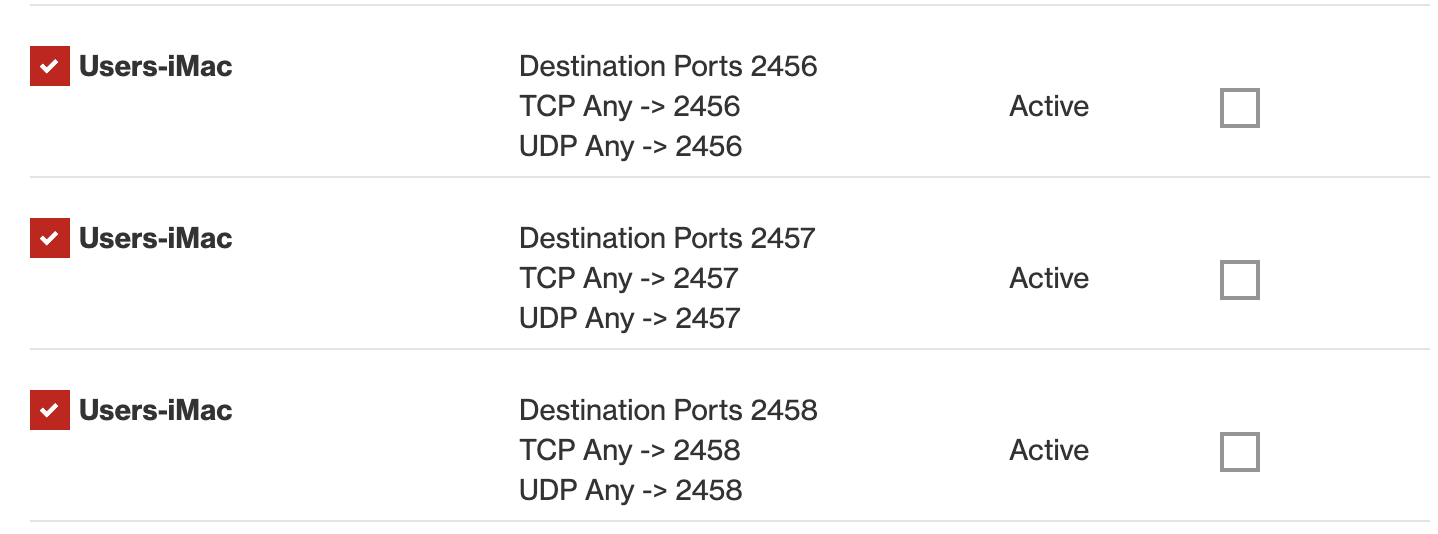
- Create 3 new port forwarding rules for the host machine’s LAN IP that allow any traffic to 2456, 2457, and 2458, all for UDP.
We can use external tools and websites to see if the ports were opened correctly.
- Turn on the Valheim server if it is not already running.
- First, find your public IP address. Head to whatsmyip.com and keep a note of the IP v4 address. Note most home ISPs use dynamic IPs, so at some point your IP will change and you will have to update any configurations based on the your public IP.
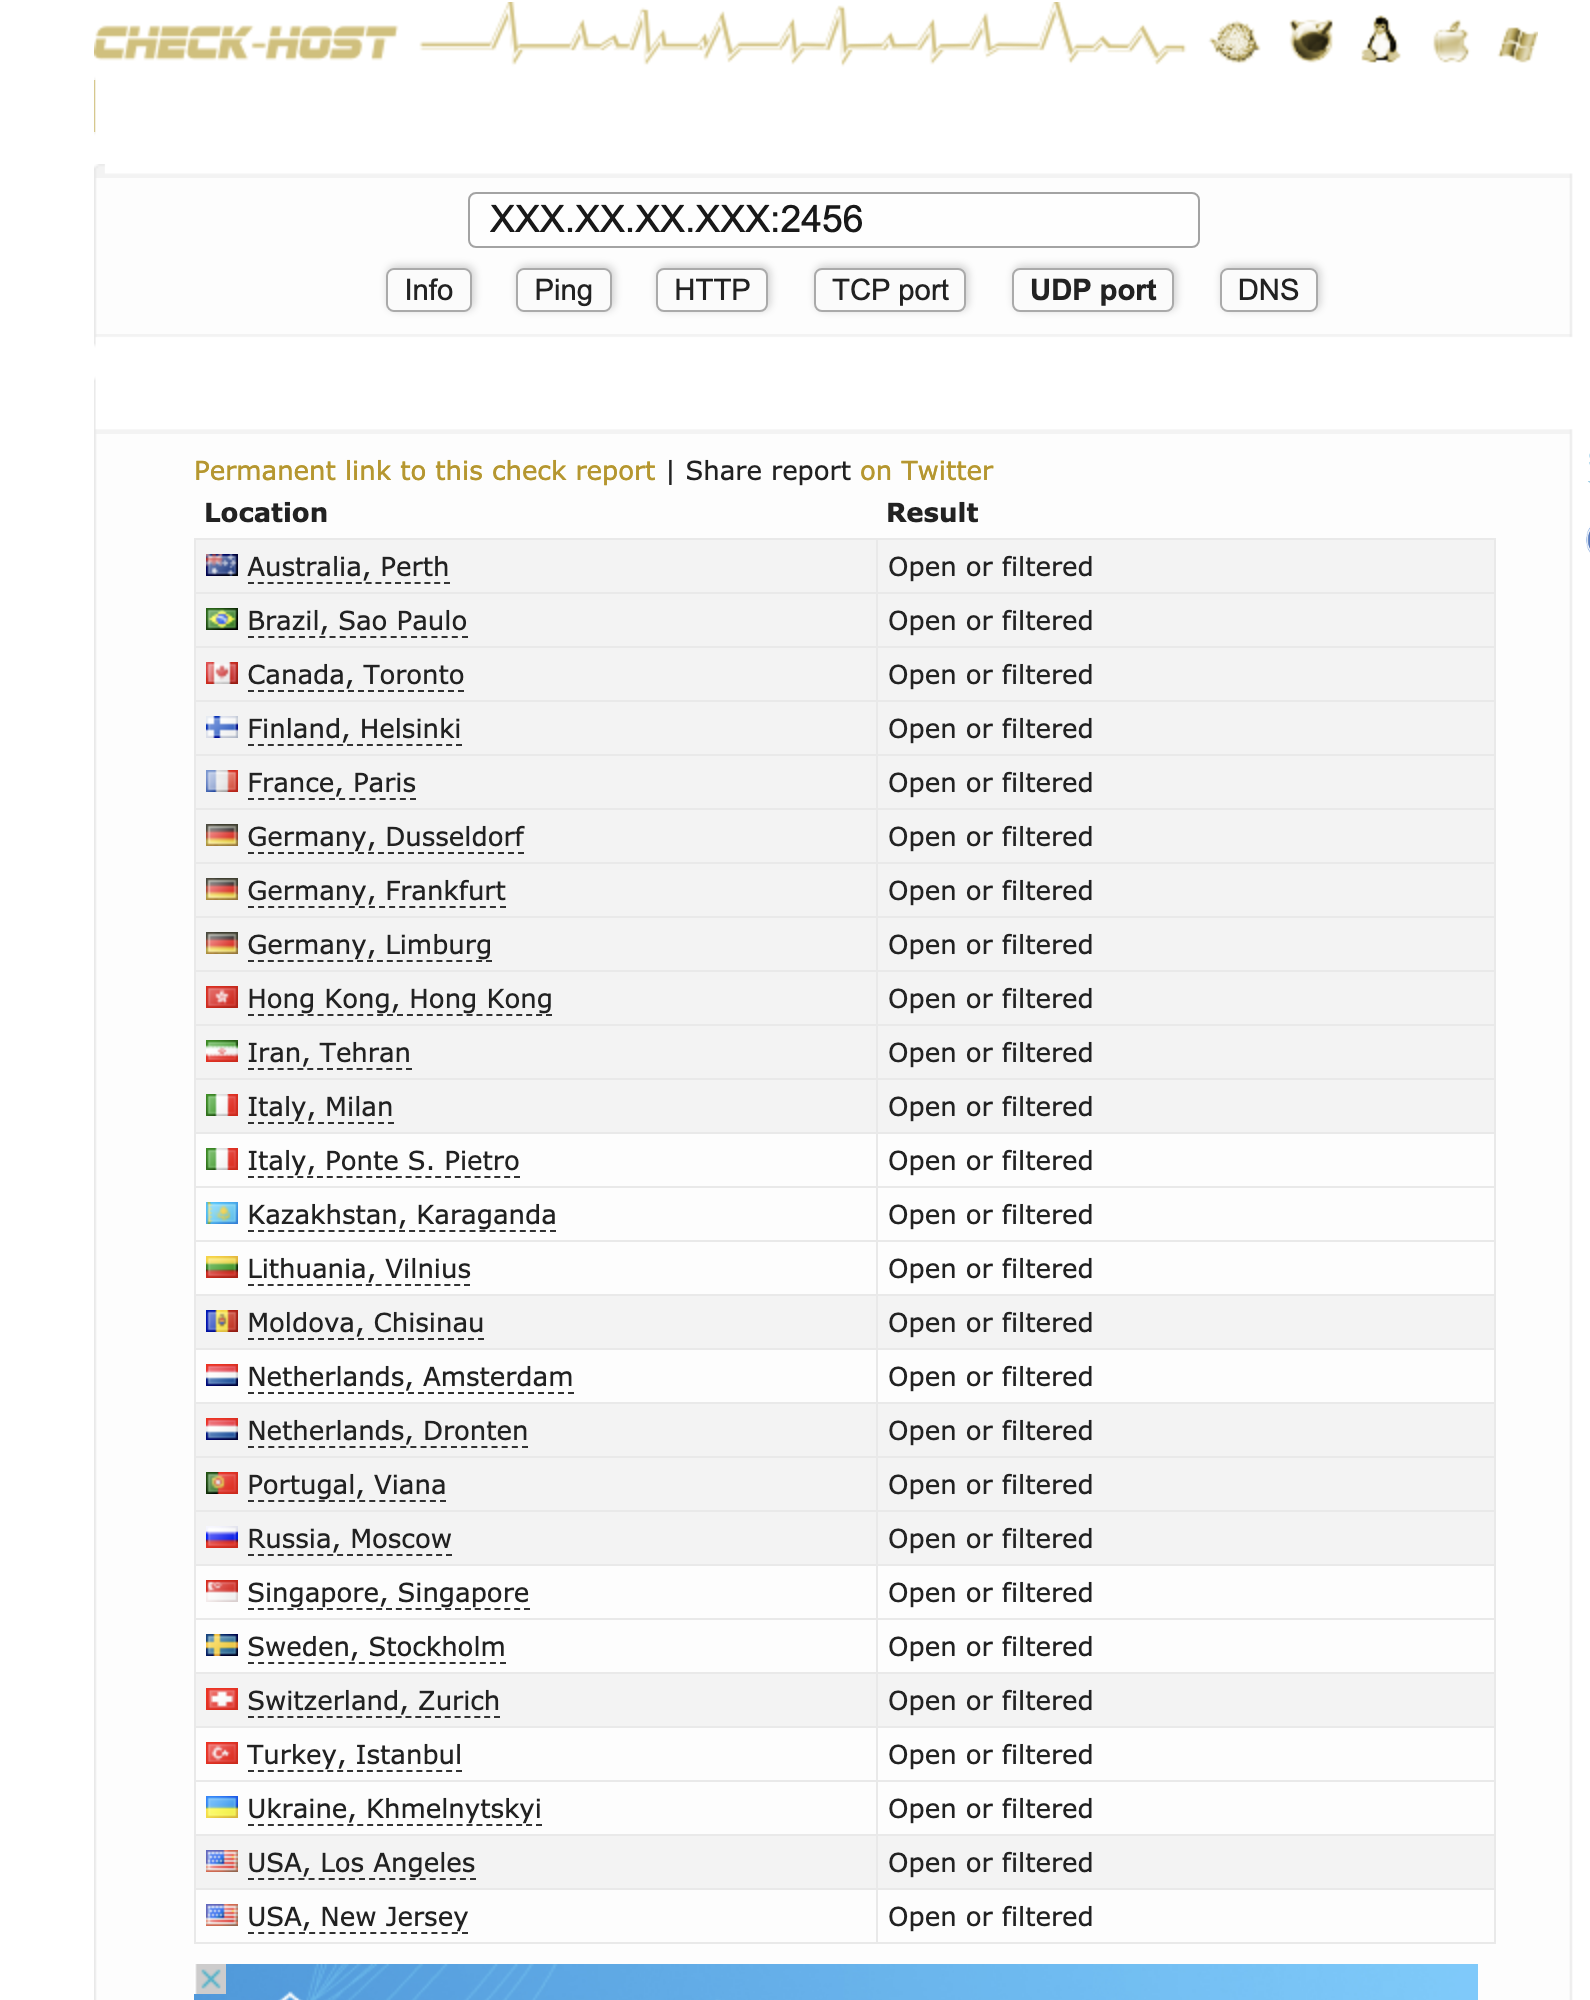
- Head to check-host.net and put in your public IP address followed by a colon and then the port number. We will test each port (2456, 2457, 2458) individually. Then hit the “UDP port” button. If your ports are open you should see similar results to mine below. If you see “Open or Filtered” it means it’s working. If you see “Connection Refused”, re-check your port forwarding settings and make sure the Valheim server is running.
Access your server on Steam
With the server running and the proper ports exposed, we can finally use the server on Steam!
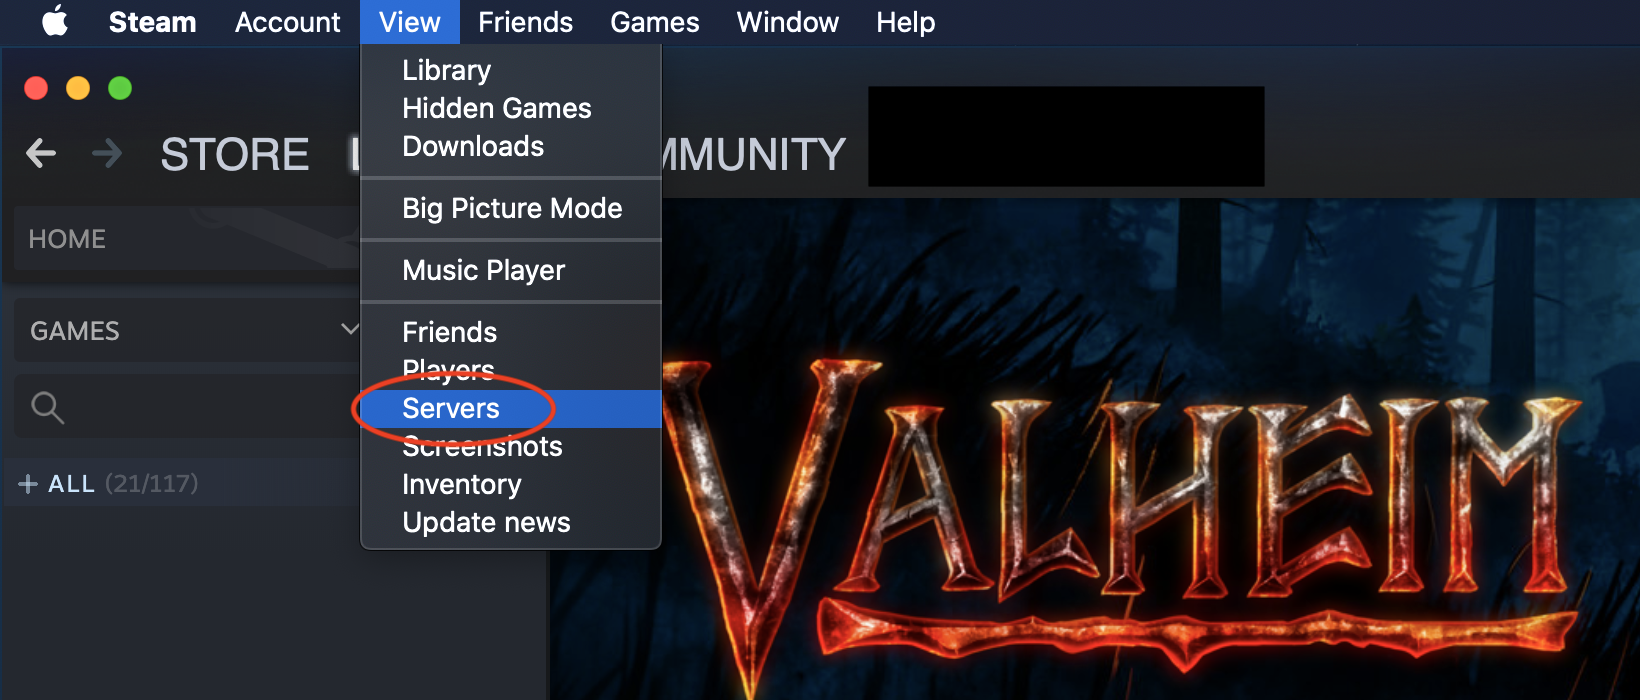
Head to your Steam client and access servers from the view menu:
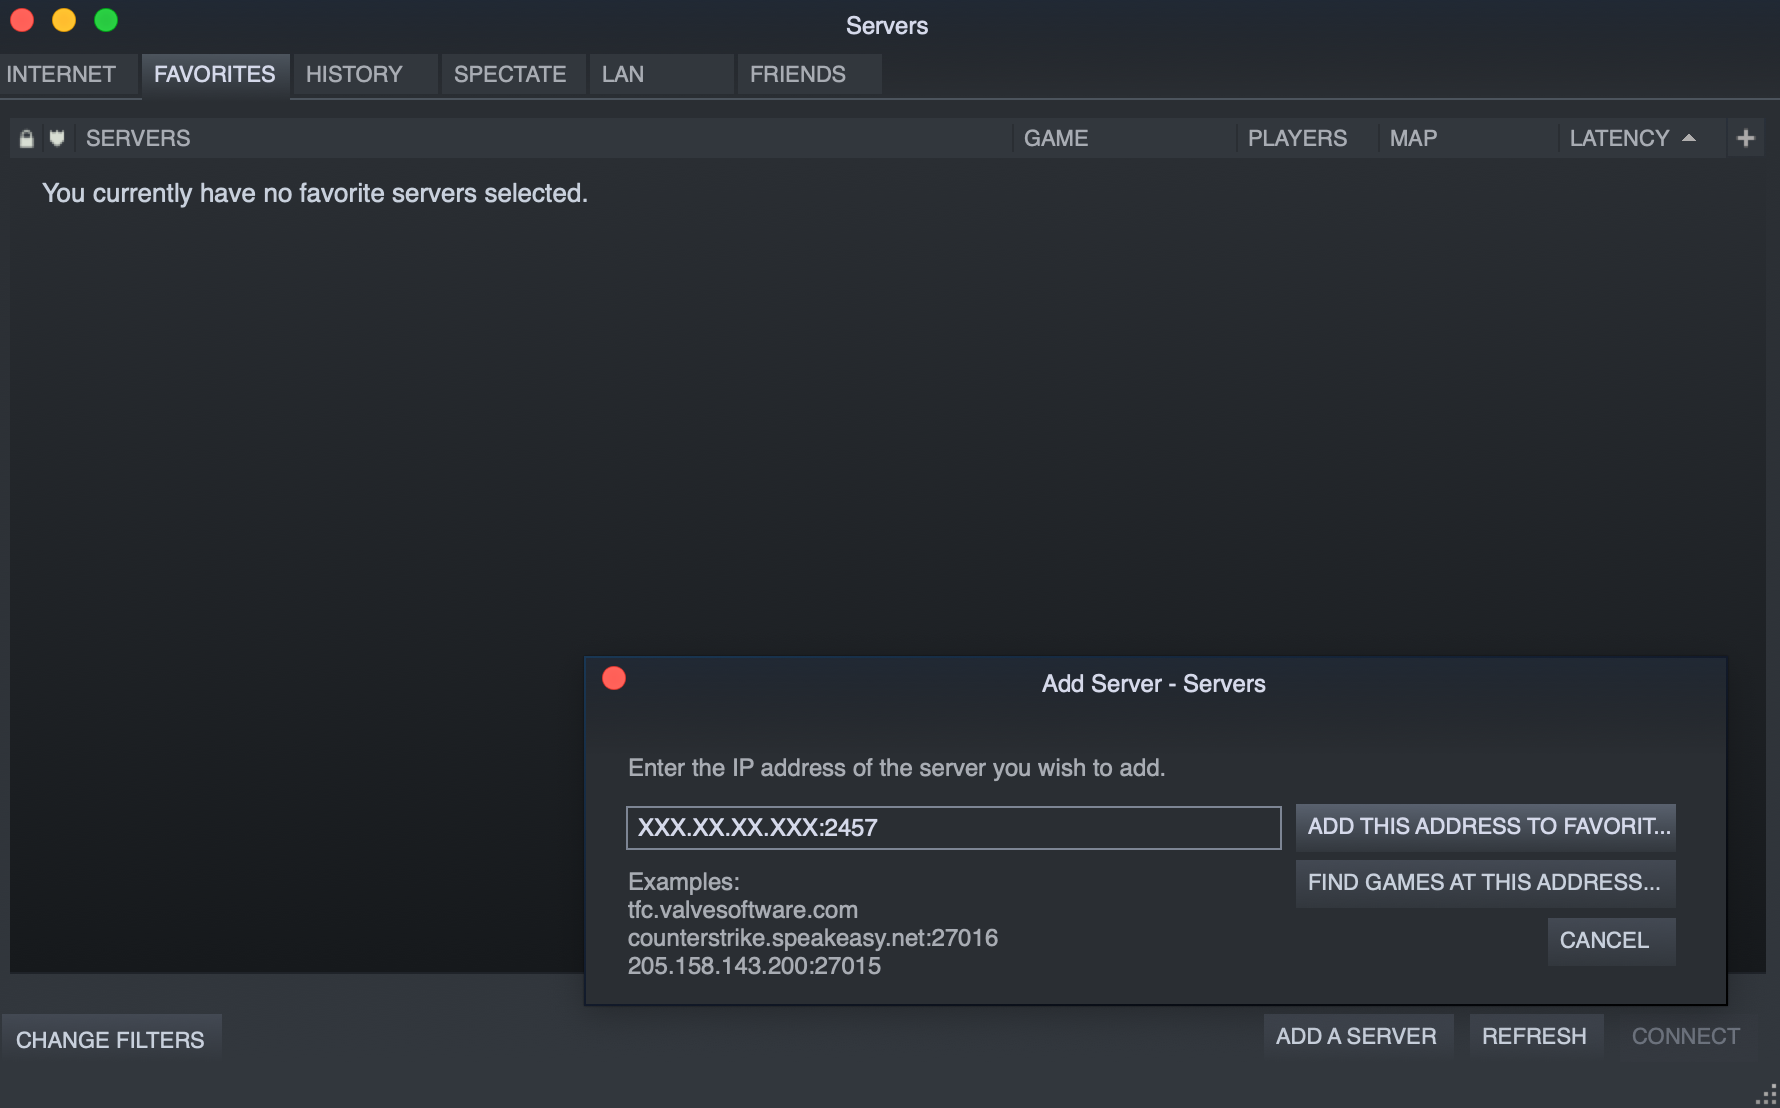
This will open a new window to manage servers. Select the “Favorites” tab and then “Add a server”. Enter your IPv4 address followed by port 2457, then add the server:
If it works, you’ll see your server listed like mine:
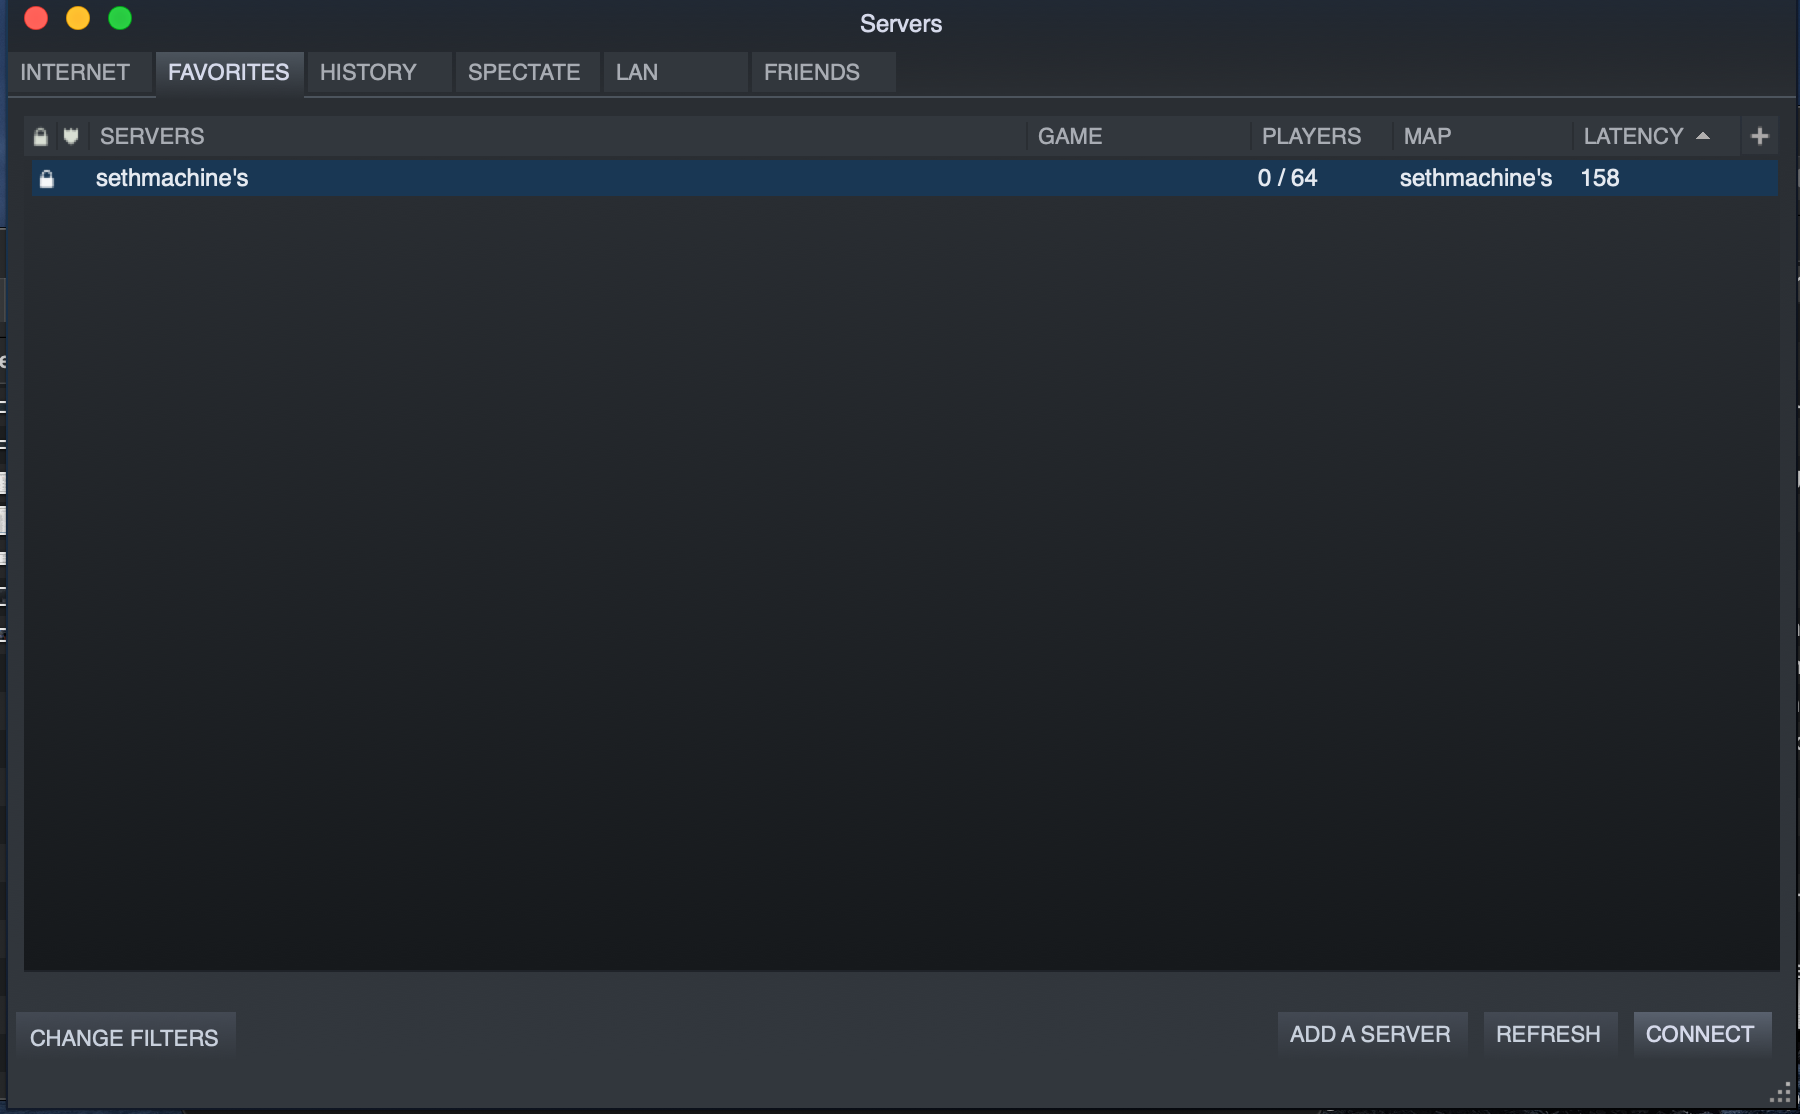
If you do not see anything, trying hitting the refresh button. If your server is listed as offline or unable to connect, re-visit the previous steps. Make sure your server is actually running. Make sure ports 2456, 2457, and 2458 are exposed.
Finally, we can actually join the server in Valheim!

Final thoughts
We were able to successfully run the Valheim server on a Docker container, and allow it to be accessible so others can join! We created a custom start script so the server would shut down properly and save world data.
I’ve made a Docker image available on Docker Hub and the corresponding Dockerfile and script on GitHub:
- Docker Hub: sethmachineio/valheim-server
- GitHub: valheim-server-docker
Feel free to leave a comment if you found this helpful, have any feedback, or are stuck on any parts of this guide. I’ll do my best to respond and help you!
Follow up tasks
There a few improvements we can make to make the Valheim server easier to use. I will address these in a separate follow-up guide.
- Automatically updating the server software without rebuilding the Docker image. When Valheim provides updates to its game client, players on the newer client cannot join servers running on older versions of Valheim. Right now to fix this requires stopping the server and building a new image using the
--no-cacheoption. As a follow-up we should modify the running container to automatically update itself whenever Valheim is updated. - Create backups of worlds periodically. If anything should happen to the worlds save file (corrupted, accidentally deleted, someone griefs the server), it would be nice to have backups to revert to.